
Cheap backsplash ideas are the secret weapon for kitchen transformations that won’t drain your bank account. I’ve been amazed at how a simple backsplash upgrade can completely revitalize a tired kitchen space without requiring a full renovation.
Whether you’re a DIY enthusiast or just someone looking for affordable backsplash ideas, there’s never been a better time to tackle this project. In fact, with materials like subway tiles priced as low as $2 per square foot, you can create a stunning focal point on a minimal budget. Many inexpensive backsplash ideas, such as peel-and-stick tiles, offer a beautiful, budget-friendly alternative to traditional options. Easy backsplash ideas like mosaic tiles come pre-mounted on mesh backing, allowing you to cover an entire square foot at once. Plus, a well-designed backsplash can add genuine value to your home by enhancing your kitchen’s overall appeal.
I always tell my friends that DIY backsplash ideas are surprisingly accessible – with the right tiles and some determination, you can complete the entire project in a single weekend. From ceramic and porcelain options costing between $10 to $30 per square foot to charming penny tiles that offer unbeatable versatility, these cheap kitchen backsplash ideas deliver premium style without the premium price tag.
Peel-and-Stick Subway Tiles

Image Source: YouTube
Peel-and-stick subway tiles represent one of the most accessible and budget-friendly backsplash options available today. Unlike traditional tiling that requires mortar, grout, and specialized tools, these self-adhesive panels offer an appealing shortcut to a stylish kitchen.
Peel-and-Stick Subway Tiles Overview
Peel-and-stick subway tiles typically come in sheets that mimic the classic rectangular shape and clean lines of traditional ceramic subway tiles. Most are made from vinyl or PVC with a 3D textured surface that creates a realistic tile appearance. These affordable backsplash ideas range from $17 to $36 per pack, covering approximately 10-12 square feet. You’ll find them in various colors including classic white, bold black, soothing green, and trendy blue options. The thickness varies between products, with thinner tiles generally being easier to cut and install.
Why Peel-and-Stick Subway Tiles Work
These inexpensive backsplash ideas have gained popularity for several compelling reasons:
- Time-saving installation that transforms spaces in hours rather than days
- No special tools required – just basic household items like scissors or a utility knife
- DIY-friendly application that doesn’t need professional installation
- Cost-effective solution that saves on both materials and labor
- Removable nature makes them ideal for renters or frequent redecorators
Furthermore, many options feature a glossy finish that mimics ceramic tile, creating a high-end look without the premium price tag. Additionally, they’re easy to clean with just a damp cloth, eliminating the need for specialized cleaners.
Installation Tips for Peel-and-Stick Subway Tiles
For successful application of these easy backsplash ideas, preparation is essential. First, thoroughly clean your wall surface with a degreaser, especially in kitchens. Allow the wall to dry completely before beginning installation. Subsequently, create a level guideline on the wall to ensure your first row of tiles is straight.
When cutting tiles, score both the front and adhesive side for cleaner edges. For detailed cuts around outlets, use tin snips or a utility knife. Notably, after applying each piece, press firmly across the entire surface to ensure proper adhesion. For best results, avoid stretching the sheets during application as this can cause warping.
Painted Tile Backsplash

Image Source: YouTube
Transforming outdated tiles with paint offers a remarkable way to create a new backsplash without demolition. Painting existing tiles costs significantly less than replacement, making it a perfect option for budget-conscious homeowners.
Painted Tile Backsplash Basics
Painting a tile backsplash involves properly preparing the surface and applying specialized coatings. This approach works best on wall tiles in kitchens or bathrooms that aren’t directly exposed to water. While painted tile can dramatically change your space’s appearance, it’s worth noting this solution might not last as long as traditional ceramic tile installations. Consequently, it’s ideal for areas with minimal moisture exposure and moderate traffic.
For successful application, thorough cleaning is essential. Begin by removing grease with trisodium phosphate, lightly sanding with 220-grit sandpaper, and applying a deglosser to create a receptive surface.
Best Paints for Painted Tile Backsplash
Several paint options can deliver excellent results:
- Epoxy-based tile paint: Ideal for high-impact areas though requiring longer drying times
- Premium acrylic enamel paint: Works well with proper primer, even satin finish can be effective
- Specialized options: Products like Aura Bath & Spa for humid environments or Advance waterborne alkyd for other rooms
The secret to longevity lies in proper priming. INSL-X STIX Waterborne Bonding Primer provides unparalleled adhesion on glossy surfaces. Alternatively, Zinsser primer creates an excellent base even when using paint with built-in primer.
Design Ideas for Painted Tile Backsplash
Painted backsplashes offer countless creative possibilities beyond solid colors. Stencils can create eye-catching patterns by working one tile at a time. Classic blue and white designs inspired by Portuguese traditions remain timeless choices. Meanwhile, floral motifs bring natural elements indoors, while Mediterranean-inspired patterns add warmth and character.
For added protection in bathroom installations, consider applying a final gloss coat after the paint has fully dried.
Mosaic Tile Sheets

Image Source: YouTube
Mosaic tile sheets have emerged as a versatile solution for homeowners seeking high-impact backsplash designs without breaking the bank. These intricate tile arrangements offer both visual interest and practical benefits for DIY enthusiasts.
What Are Mosaic Tile Sheets?
Mosaic tiles are small pieces (typically 2 inches or less) of ceramic, glass, stone, or porcelain arranged in distinctive patterns. Instead of installing individual tiny tiles, today’s mosaic tiles come pre-attached to mesh fiberglass backing in approximately one-square-foot sheets. This modern sheeting technique makes installation remarkably straightforward compared to traditional methods. Glass mosaics offer vibrant color options and light-reflecting properties, whereas stone variants provide natural textures and earthier esthetics.
Why Mosaic Tile Sheets Are Budget-Friendly
The affordability of mosaic tile sheets stems primarily from their installation efficiency. Since they cover larger areas at once, I’ve found they reduce both labor time and costs for cheap backsplash projects. Furthermore, these sheets can be strategically used as accents rather than full coverage – cutting 12×12-inch sheets in half creates stunning 6×6-inch borders that stretch your tile budget. Ceramic and porcelain options typically offer the most economical price points among inexpensive backsplash ideas, although glass alternatives provide an opulent appearance without premium costs.
How to Install Mosaic Tile Sheets
For successful DIY backsplash installation, proper preparation is essential. Begin by ensuring your substrate (wall surface) is perfectly flat and smooth. Apply thin-set adhesive using a notched trowel, working in sections about 2-3 feet square. Press mosaic sheets into the adhesive, using tile spacers between sheets to maintain uniform gaps. Afterwards, gently tap the surface with a rubber float or small piece of wood to ensure proper adhesion without squeezing out excess adhesive. Allow 24-48 hours before applying grout.
Wallpaper Backsplash

Image Source: Remodelista
Wallpaper offers an eye-catching way to create cheap backsplash ideas with minimal effort and maximum visual impact. This budget-friendly option lets you mimic expensive materials like tile, marble, and wood without the hefty price tag.
Wallpaper Backsplash Styles
Wallpaper backsplashes come in countless design options to complement any kitchen esthetic. In essence, you can choose vibrant patterns that become a centerpiece of your kitchen or opt for designs that mimic pricier materials. Botanical prints bring natural elements indoors, moreover, geometric designs add modern flair. Primarily, wallpaper allows you to introduce colors and patterns that complement your existing kitchen design.
Waterproofing Your Wallpaper Backsplash
Protecting your wallpaper is crucial for longevity. Many designers recommend covering wallpaper with tempered glass, particularly behind ranges. Alternatively, apply a decorators varnish after installation – wait 24-48 hours for the wallpaper to dry completely, then use a fine brush to apply three coats of deadflat matte varnish, creating an invisible protective seal. For maximum protection, consider applying one coat of satin varnish followed by deadflat coats.
Best Wallpaper Types for Kitchens
Vinyl wallpaper stands as the top choice for DIY backsplash ideas, offering exceptional durability against everyday kitchen wear. Non-woven options work well but may require additional protection from hot, fatty stains. Peel-and-stick varieties provide the easiest installation with no paste needed. Nonetheless, always avoid textile and highly textured wallpapers, as they trap grease and are difficult to clean.
Beadboard Paneling

Image Source: The Spruce
Beadboard’s distinctive vertical grooves offer a timeless charm that makes it an ideal cheap backsplash idea. This classic paneling brings cottage-style warmth to kitchens without breaking the bank.
Beadboard Paneling for Backsplash
Beadboard consists of narrow vertical planks separated by small ridges or “beads,” creating subtle wall definition. Beyond its decorative appeal, beadboard paneling works admirably as a backsplash because it’s both stylish and practical. Indeed, it fits beautifully with farmhouse, coastal, and cottage design themes. One safety consideration: if installing behind an oven, ensure your model allows for it, as beadboard can be flammable.
Cost and Materials for Beadboard Paneling
Price-wise, beadboard is remarkably affordable—typically under $20 per sheet. I’ve found complete kitchen installations can cost as little as $30-40 total. Material options include:
- MDF: Traditional and paintable, good for most applications
- PVC: Water-resistant, ideal for areas prone to splashes
- Wood: Classic appearance with natural texture
Installation Tips for Beadboard Paneling
Initially, preparation is crucial—clean your wall surface thoroughly and measure carefully. For installation, you’ll need:
- Liquid nails for adhesion
- Nail gun for secure attachment
- Caulk for sealing edges
Apply construction adhesive in circles for better suction, press firmly against the wall, and secure with nails. Finally, caulk all edges, primarily where the backsplash meets countertops, to prevent moisture infiltration.
Read other Articles – Can You Die from Acid Reflux in Your Sleep? Doctor Explains the Truth
Shiplap Backsplash

Image Source: Do Dodson Designs
Shiplap has stormed into modern kitchens as one of the most affordable backsplash ideas available, bringing charming wood textures without premium costs. This horizontal or vertical wooden paneling creates distinctive shadow lines that add dimension to any kitchen.
Shiplap Backsplash Esthetic
Shiplap fits various interior styles from farmhouse to minimalist designs. Primarily a wooden material, it offers flexibility through painting, staining, or weathering treatments to match your kitchen’s palette. Accordingly, vertical installation creates the illusion of height, whereas horizontal placement emphasizes width. For added character, eased-edge shiplap features beveled edges that create more pronounced gaps between boards.
DIY Shiplap Backsplash Installation
For a successful installation, you’ll need:
- Pre-primed shiplap boards
- Construction adhesive
- Nail gun
- Paint and rollers
Begin by thoroughly cleaning your wall surface. Use a laser level to mark your desired height. Start from the bottom, applying construction adhesive in circles for better suction. Once positioned, secure with nails. Consider adding a cap piece at the top and molding at the bottom for a finished look.
Shiplap Maintenance Tips
Despite its beauty, shiplap requires proper care. Dust regularly with a soft cloth or brush. For deeper cleaning, a solution of one cup vinegar to two cups warm water works effectively. Above all, sealing your shiplap backsplash is crucial, especially behind sinks or stoves—polyurethane sealant provides excellent moisture protection.
Vinyl Decal Backsplash

Image Source: Driven by Decor
Vinyl decal backsplashes have gained popularity as one of the most customizable cheap backsplash ideas for budget-conscious homeowners. These adhesive wonders provide a temporary yet stylish solution for kitchen and bathroom updates.
What Is a Vinyl Decal Backsplash?
Vinyl decal backsplashes consist of premium vinyl materials that adhere directly to your wall. These waterproof, heat-resistant, and anti-mold stickers create the illusion of expensive tile work without the hefty price tag. Remarkably durable yet easily removable, vinyl decals offer renters or those who enjoy frequent design changes an affordable backsplash option that won’t damage walls upon removal.
Design Options for Vinyl Decals
The design possibilities with vinyl decals are virtually limitless. From Mediterranean-style patterns to subway tile replicas, these inexpensive backsplash ideas come in countless styles. Furthermore, crafty DIYers can create custom designs using Cricut machines, allowing for personalized patterns in any scale or color combination. To create the effect of real subway tile, simply apply vinyl stickers over a painted wall that serves as the “grout” color.
How to Apply Vinyl Decals
Installing vinyl decals requires minimal tools yet delivers maximum impact. First, ensure walls are smooth, dry, clean, and firm. Proper preparation includes:
- Using a level to create horizontal guidelines
- Avoiding stretching material during application
- Pressing firmly across the entire surface after placement
For optimal results, use a plastic scraper to eliminate air bubbles as you apply.
Chalkboard Paint Backsplash
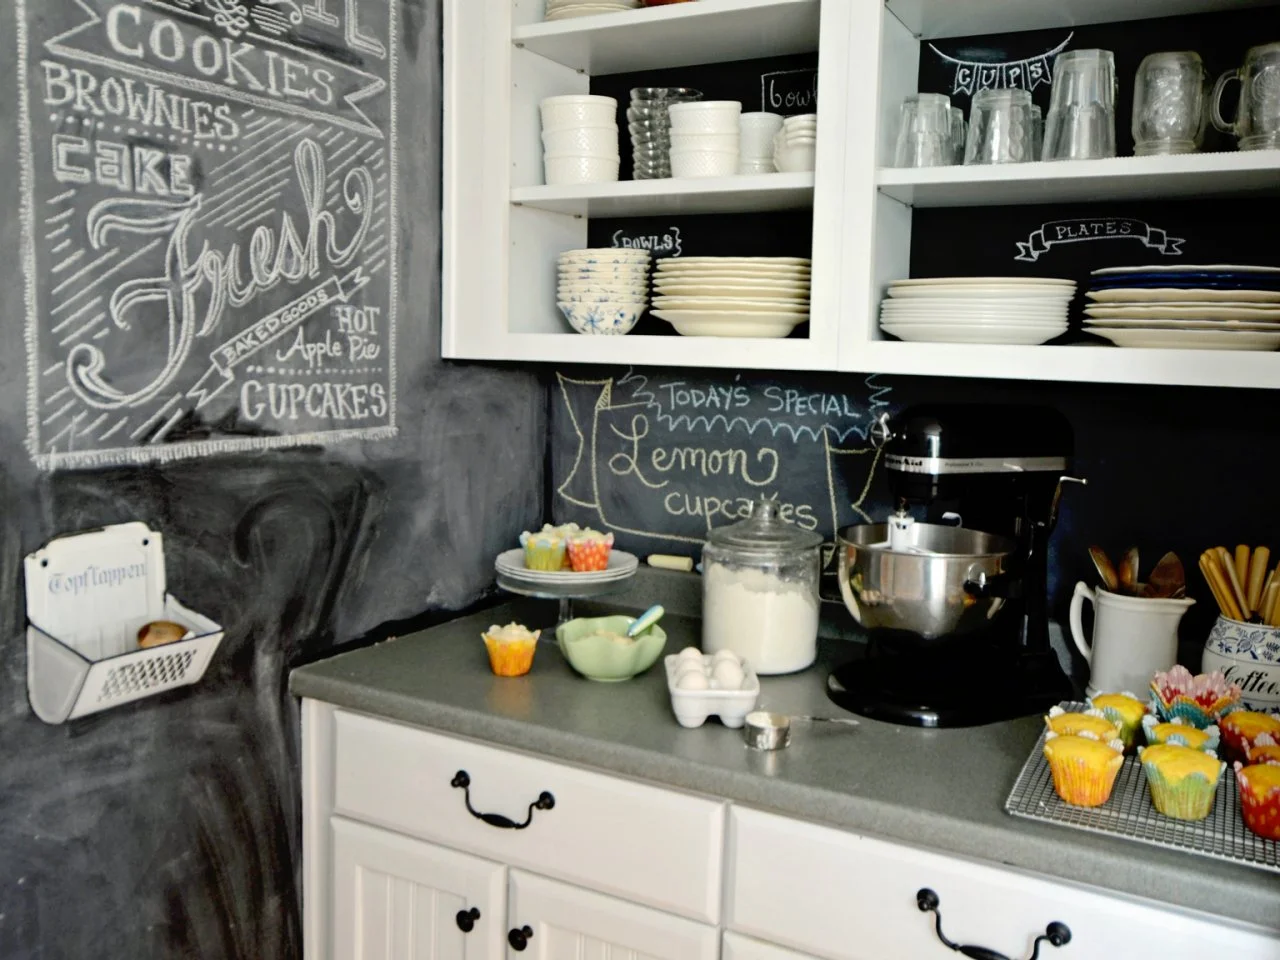
Image Source: HGTV
For under $10, a can of chalkboard paint delivers one of the most versatile cheap backsplash ideas available today. This functional surface combines creativity with practicality in ways other backsplash materials simply cannot match.
Chalkboard Paint Backsplash Ideas
Firstly, the classic black chalkboard backsplash offers the simplest approach—apply special paint to a smooth, clean wall to create a durable writing surface. For a more polished appearance, consider a framed chalkboard panel that provides defined edges and splash protection. Alternatively, try a full-wall statement that transforms your entire kitchen wall into a giant canvas. Beyond basic black, dark green chalkboard paint delivers a softer, vintage schoolhouse esthetic that pairs beautifully with brass hardware and natural wood.
Best Chalkboard Paints
Standard chalkboard paint typically costs around $10 per can—making it among the most affordable backsplash ideas. Rustoleum offers a popular option that applies easily with a roller. Most paints require two coats with approximately 30 minutes drying time between applications. Upon drying, the finish transforms from shiny to an appropriate matte surface. Interestingly, chalkboard paint now comes in 12 different colors besides traditional black.
Creative Uses for Chalkboard Backsplash
A chalkboard backsplash functions as a kitchen command center where family members can write shopping lists, menu plans, or daily quotes. Behind the stove, use it to note cooking times or that evening’s dinner menu. Some homeowners utilize chalk pens for recipes that won’t smudge during cooking. Another practical application: draw a calendar or weekly meal plan directly on your kitchen wall. For additional functionality, apply magnetic primer underneath the chalkboard paint to create a surface that holds magnets.
Faux Brick Panels

Image Source: YouTube
Faux brick panels add texture and dimension to kitchens, creating dramatic focal points without the cost of real masonry. These budget-friendly alternatives deliver the charm of traditional brickwork at a fraction of both price and installation complexity.
Faux Brick Panel Overview
Faux brick panels typically come in polyurethane, PVC, or glass-reinforced plastic (FRP) materials. The panels are lightweight, flexible, and easy to cut with standard household tools. Most options are designed to be water-resistant, heat-resistant, and UV-stable—essential qualities for kitchen applications. Currently available in various styles from weathered to modern, these panels mimic the look of old, new, or painted brick.
Why Faux Brick Looks Expensive
The realistic 3D textures on quality faux panels create convincing shadow effects that replicate authentic masonry. These panels maintain their appearance over time, primarily due to their resistance to cracking, fading, and moisture damage. Unlike real brick that requires mortar and specialized installation, faux options deliver the same esthetic appeal without complicated craftsmanship. Most panels come with a 25-year warranty, providing exceptional long-term value.
Installing Faux Brick Panels
Installation requires basic preparation:
- Clean walls thoroughly with degreaser to remove kitchen grease
- Measure carefully and mark placement with a level
- Cut panels using a circular saw for straight lines and jigsaw for outlets
Apply liquid adhesive in circles for better suction, then press firmly against the wall. Many styles need no additional sealing, henceforth saving extra steps compared to real brick installation. For complete protection in moisture-prone areas, consider adding a clear polyurethane coating.
Glass Tile Accents

Image Source: Better Homes & Gardens
Glass tile accents offer a touch of luxury to inexpensive backsplash ideas, bringing radiance and depth to kitchen spaces. These reflective beauties capture and enhance light, simultaneously creating the illusion of greater space.
Glass Tile Accent Styles
Glass tiles come in numerous forms that elevate cheap backsplash ideas. Precision laser-cut glass fused with vivid glazes creates an instantly modern look. You’ll find options in both sumptuous matte finishes that diffuse light and reflective gloss that amplifies brightness. As a result, even simple white glass grabs attention in ways other tiles cannot. Beyond basic colors, glass tiles offer dramatic options like navy blue that can be arranged in striking patterns. Many homeowners opt for unique shapes including hexagons, herringbone arrangements, or vertical installations that visually elongate spaces.
Where to Use Glass Tile Accents
Glass tiles excel as strategic accents throughout kitchens. For instance, use them as borders or trims to complement another tile design. They work brilliantly as focal points behind cooktops or as striking frame accents around windows. Equally important, glass mosaics create eye-catching displays when installed on accent walls adjacent to cabinetry. Given their water resistance, these tiles perform exceptionally well in moisture-prone areas.
Cost-Effective Glass Tile Options
To incorporate glass on a budget, consider using it selectively. Small glass accents deliver maximum visual impact while minimizing cost—cutting 12×12 sheets in half creates stunning 6-inch borders that maximize value. Likewise, mixing glass with less expensive ceramic tiles provides esthetic variety without breaking your budget.
Penny Tile Backsplash

Image Source: YouTube
The circular elegance of penny tiles creates distinctive patterns that transform ordinary kitchens into character-filled spaces. These small, coin-sized tiles arranged in a grid formation provide a welcome contrast to the straight lines of counters and cabinets.
Penny Tile Backsplash Design
Penny tiles typically range under an inch in diameter, making them perfect for tight spaces like backsplashes. Available in porcelain, ceramic, or glass materials, they offer endless color possibilities to complement various design styles. White penny tiles create a timeless, clean esthetic that works with both traditional and contemporary kitchens. For a dramatic statement, consider pairing white penny tiles with dark grout for a classic Parisian café look. Alternatively, tone-on-tone designs deliver a more contemporary feel.
Why Penny Tiles Are Great for DIY
Primarily, penny tiles are budget-friendly—costing as little as $4 per square foot at most home improvement stores. Their flexibility allows them to wrap around edges, offering unique capabilities other tiles lack. Additionally, penny tiles create non-slip surfaces, making them ideal for moisture-prone areas. Most importantly for DIYers, they don’t require a diamond blade tile saw for cutting—simple tile nippers priced between $8-15 will suffice.
Installation Tips for Penny Tiles
Installing penny tiles requires attention to detail. Use a properly sized trowel (1/8 or 3/16 v-notch) to prevent mortar from oozing between tiles. Work in small sections, applying just enough mortar for 3-4 sheets at a time. Pre-cut individual tiles in various sizes before installation to speed up the process. Consider choosing grout color similar to your tile color to minimize visible installation mistakes.
Wood-Look Tile Backsplash

Image Source: This Old House
Wood-look tile backsplashes bring natural warmth to kitchens without the maintenance hassles of actual timber. This affordable backsplash idea mimics authentic wood grain while offering superior performance in moisture-prone areas.
Wood-Look Tile Overview
Made primarily from porcelain or ceramic, these tiles capture the intricate details and texture of real wood planks. Modern manufacturing techniques create remarkably realistic wood grain patterns that can fool even discerning eyes. Available in various plank sizes and finishes from hand-scraped to matte, these tiles provide endless design possibilities for DIY backsplash projects.
Benefits of Wood-Look Tiles
Unlike natural wood, these cheap kitchen backsplash options resist water damage, staining, scratching, and UV fading. Therefore, they perform exceptionally well in splash zones. Furthermore, they never require sanding, refinishing, or sealing like real wood does. With prices often more affordable than actual timber, wood-look tiles offer inexpensive backsplash ideas that maintain a high-end appearance for years.
Installing Wood-Look Tiles
Installation typically requires proper surface preparation – ensuring walls are clean and level. Apply thin-set mortar using a notched trowel, then position tiles in a staggered pattern resembling real wood. For backsplashes, rectified edges allow for minimal grout lines as narrow as 3/16-inch. Consider matching grout color to tile for a seamless appearance.
Metallic Peel-and-Stick Tiles

Image Source: YouTube
Metallic peel-and-stick tiles elevate inexpensive backsplash ideas with their sophisticated sheen. These self-adhesive options provide an upscale look without premium costs, making luxury backsplash designs attainable for every budget.
Metallic Tile Styles
Typically available in stainless steel, brushed aluminum, copper, and brass finishes, these tiles offer both subtle shine and dramatic reflections. The Aspect brand comes in stainless, champagne, copper and bronze options. In particular, many designs mimic vintage tin ceiling tiles, creating antique appeal. Beyond basic finishes, you’ll discover various shapes including hexagons, art deco fans, penny rounds, herringbone, and subway patterns.
Where to Use Metallic Tiles
Metallic tiles work exceptionally well as kitchen backsplashes and in wet bars, specifically because they resist heat, moisture and stains. They’re perfect for bathroom wall accents or as ceiling tiles for vintage charm. As such, they can highlight architectural features like alcoves or shower enclosures. A copper-colored tile backsplash can serve as a focal point when paired with white surroundings.
Installation Tips for Metallic Tiles
Proper wall preparation is crucial—ensure surfaces are clean, smooth and dry. The pressure-sensitive adhesive requires precise positioning as it doesn’t allow repositioning after firm application. For best results, “dry fit” tiles first before removing backing paper. Clean finished installations with soft cloths and non-acidic cleaners to preserve the metallic finish.
Vintage Map Backsplash

Image Source: House Digest
Maps offer a distinctly personal touch as cheap backsplash ideas, creating conversation-starting focal points that blend meaningful locations with artistic design. Often costing far less than traditional tile options, these geographic statements provide both sentiment and style.
Using Maps as Backsplash
Several approaches exist for incorporating maps into your kitchen design. Self-adhesive wallpaper maps provide the simplest installation method, available in nautical styles for coastal kitchens or antique world maps for vintage vibes. Alternatively, repurpose existing paper maps by attaching them to thin plywood before mounting. For maximum durability, custom tempered glass backsplashes featuring maps offer superior protection and easy cleaning. Companies like Elyese on Amazon can even create personalized glass panels using maps of your hometown.
How to Seal a Map Backsplash
Proper sealing is essential for longevity, particularly in moisture-prone areas. For paper maps, start by applying them to a sturdy backing, then coat with shellac before installation. The most effective protection comes from covering your map with tempered glass or clear Perspex panels. In essence, this creates a wipe-clean surface while preserving the delicate paper underneath. Professional services can also create ceramic tile murals featuring maps, essentially eliminating sealing concerns.
Design Themes for Map Backsplash
Map backsplashes accommodate various design preferences. Nautical charts work beautifully in coastal kitchens, complementing blue and white color schemes. Historical maps deliver vintage charm—consider an 1865 map replica for distinctive character. Custom options allow highlighting areas with personal significance, from hometowns to favorite vacation destinations. Ultimately, whether installed behind a stove as a focal point or extended wall-to-ceiling for dramatic impact, map backsplashes deliver affordable personalization.
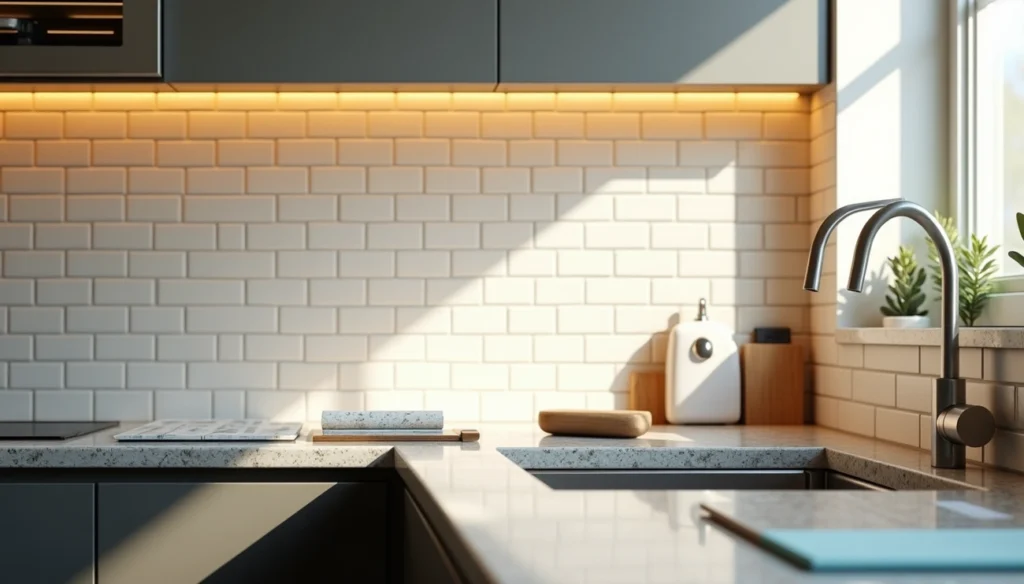
Ceramic Subway Tiles

Image Source: MyDomaine
Ceramic subway tiles trace their roots back to early 1900s New York City subway stations, where they first appeared as practical yet attractive wall coverings. Decades later, these rectangular classics remain among the most sought-after cheap backsplash ideas for budget-conscious renovators.
Classic Ceramic Subway Tile Look
Traditional subway tiles measure 3×6 inches with a 1:2 ratio that creates their signature rectangular shape. Originally designed in glossy white to maximize brightness in underground spaces, these tiles helped create a clean, sanitary feeling—qualities homeowners still value today. Currently, their smooth, glazed surface resists stains and water, requiring only simple cleaning with mild detergent to maintain their pristine appearance.
Affordable Ceramic Tile Options
Basic white ceramic subway tiles rank among the most economical backsplash materials available, often priced under $5 per square foot. These inexpensive backsplash ideas offer exceptional value considering their durability and longevity. Beyond classic white, affordable options now include various colors that complement diverse kitchen styles. Their non-porous nature prevents bacteria buildup, making them particularly suitable for DIY backsplash projects behind cooking areas.
Layout Patterns for Ceramic Tiles
The versatility of these easy backsplash ideas extends through numerous installation patterns:
- Running bond/offset pattern: The traditional brick-like arrangement with tiles offset by half their width
- Herringbone: Creates dynamic movement with tiles arranged at 45° or 90° angles
- Stacked vertical or horizontal: Forms clean, modern lines with tiles aligned precisely
Undoubtedly, grout color selection dramatically impacts the final look—white creates seamless appearances while dark grout highlights individual tiles.
DIY Washi Tape Backsplash

Image Source: Apartment Therapy
Washi tape transforms bland kitchen walls into colorful backsplashes for under $20, making it one of the most budget-friendly DIY options available. This Japanese rice paper tape provides a completely customizable backsplash solution that installs in hours.
What Is a Washi Tape Backsplash?
Washi tape is a decorative adhesive made from rice paper that comes in countless colors and patterns. Unlike other materials, it removes cleanly without damaging walls or leaving residue, making it ideal for renters seeking affordable backsplash ideas. Remarkably versatile, washi tape adheres to various surfaces including paper, glass, wood, plastic, and metal. Most varieties range from 5mm to 150mm in width, offering flexibility for different design applications.
Best Patterns for Washi Tape
The design potential is virtually limitless for inexpensive backsplash creation. Popular patterns include:
- Geometric shapes – create zigzags, asterisks, or linear designs
- Confetti-like sprinkles – for playful, colorful spaces
- Stripes – mimic traditional tile layouts
- Checkered patterns – create a classic look
Frankly, using multiple colors creates the most visually striking effect, plus you can change designs whenever inspiration strikes.
Where to Use Washi Tape Backsplash
Primarily, washi tape works best in areas away from excessive heat or moisture. Kitchens with minimal splash exposure make ideal locations. Practically speaking, it’s performed surprisingly well even through cooking and dishwashing according to users. Beyond kitchens, washi tape creates accent walls throughout homes for cohesive design.
Reclaimed Wood Panels

Image Source: Instructables
Reclaimed wood panels exude character and charm, adding rustic texture to kitchens as affordable backsplash ideas. Every board tells a story through natural aging, distinct grain patterns, and weathered imperfections that new materials simply cannot replicate.
Reclaimed Wood Backsplash Look
Reclaimed wood backsplashes range from rustic to modern designs, offering versatility for various kitchen styles. These panels can be installed in herringbone patterns, brick layouts, or as shiplap boards, wrapping your kitchen with inviting warmth. Primarily used behind sinks or as accent walls, these panels create striking focal points without overwhelming the space. With their naturally weathered appearance, they bring unique character that complements both traditional and contemporary kitchens.
Where to Source Reclaimed Wood
Finding budget-friendly reclaimed wood opens several avenues. Old pallets make excellent DIY backsplash material when carefully cleaned and prepared. Alternatively, repurposed fence posts or old furniture can be transformed into stunning backsplash elements. For professionally weathered options, specialized suppliers offer reclaimed wood typically ranging from $7 to $14 per square foot. Many products come from sustainable sources like Wyoming snow fences, naturally aged over 7-10 years.
Installation Tips for Reclaimed Wood
Prior to installation, seal both sides of wood panels with varnish, lacquer, or wood oil to protect against moisture. Subsequently, apply construction adhesive in circles for better suction, then secure with ring-shank nails. Always allow a 1/8-inch expansion gap around the perimeter so wood can naturally move. Once complete, consider applying a final protective coat for easier cleaning and maintenance.
Budget-Friendly Marble Contact Paper

Image Source: SemiStories – Semihandmade
For under $10, marble contact paper delivers the luxurious appearance of high-end stone without the hefty price tag. This peel-and-stick solution ranks among the most convincing cheap backsplash ideas available today.
Marble Contact Paper Overview
Marble contact paper consists of adhesive-backed vinyl or PVC film designed to mimic the distinct veining and coloration of natural marble. Most varieties feature grid lines on the back to facilitate precise cutting. Primarily sold in rolls ranging from 15.7-26.5 inches wide, quality options come in various marble styles from subtle veining to dramatic patterns. The thicker varieties tend to be more durable and easier to clean, making them ideal for DIY backsplash ideas in high-traffic areas.
How to Apply Marble Contact Paper
Successful application starts with thorough surface preparation. First, clean counters using dishwashing soap with good degreasing properties. Next, measure carefully and cut your contact paper slightly larger than needed. Thereafter, remove only a small section of backing initially for better control during positioning. For optimal adhesion, use a smoothing tool working from center outward to eliminate air bubbles. A hair dryer on low setting helps soften the material around corners and edges.
Where to Use It for Best Effect
Beyond countertops, marble contact paper creates dramatic results as backsplashes, particularly behind sinks. Homeowners report excellent durability in these areas, with splatter wiping clean easily. Further applications include floating shelves, mantles, and cabinet fronts. Renters particularly appreciate this removable option for temporary yet stylish upgrades. Just avoid surfaces with excessive heat exposure or rounded edges.
Read other Articles – How to Break Free From Sugar Cravings in Just 2 Weeks: A Step-by-Step Guide
Comparison Table
| Backsplash Type | Price Range | Material | Installation Difficulty | Key Benefits | Best Applications |
|---|---|---|---|---|---|
| Peel-and-Stick Subway Tiles | $17-36/pack (10-12 sq ft) | Vinyl/PVC | Easy | No special tools needed, removable | Rental properties, quick updates |
| Painted Tile Backsplash | Cost of paint + primer | Paint on existing tile | Moderate | No demolition required, customizable | Areas with minimal moisture exposure |
| Mosaic Tile Sheets | Not mentioned | Ceramic, glass, or stone | Moderate | Pre-mounted on mesh backing, covers large areas quickly | Full coverage or accent areas |
| Wallpaper Backsplash | Not mentioned | Vinyl or non-woven | Easy | Wide variety of patterns, quick installation | Areas protected by glass or varnish |
| Beadboard Paneling | Under $20/sheet | MDF, PVC, or Wood | Easy-Moderate | Affordable, cottage-style charm | Farmhouse or coastal designs |
| Shiplap Backsplash | Not mentioned | Wood or wood-like material | Moderate | Creates distinctive shadow lines | Farmhouse to minimalist styles |
| Vinyl Decal Backsplash | Not mentioned | Premium vinyl | Easy | Waterproof, heat-resistant, anti-mold | Temporary installations |
| Chalkboard Paint | Around $10/can | Paint | Easy | Functional writing surface, versatile | Menu planning, family message center |
| Faux Brick Panels | Not mentioned | Polyurethane, PVC, or FRP | Easy | Lightweight, water-resistant | Modern to rustic designs |
| Glass Tile Accents | Not mentioned | Glass | Moderate | Light-reflecting, water-resistant | Focal points, borders, accent walls |
| Penny Tile | As low as $4/sq ft | Porcelain, ceramic, or glass | Moderate | Non-slip surface, flexible | Moisture-prone areas |
| Wood-Look Tile | Not mentioned | Porcelain or ceramic | Moderate | Water-resistant, low maintenance | High-moisture areas |
| Metallic Peel-and-Stick | Not mentioned | Various metallic finishes | Easy | Heat and moisture resistant | Wet bars, kitchen focal points |
| Vintage Map | Not mentioned | Paper/glass covering | Moderate | Personalized, conversation starter | Areas with glass protection |
| Ceramic Subway Tiles | Under $5/sq ft | Ceramic | Moderate | Durable, stain-resistant | Traditional kitchen designs |
| Washi Tape | Under $20 total | Rice paper tape | Very Easy | Removable, customizable | Low-moisture areas |
| Reclaimed Wood | $7-14/sq ft | Natural wood | Moderate-Difficult | Unique character, sustainable | Accent walls, sink backsplash |
| Marble Contact Paper | Under $10 | Vinyl/PVC | Easy | Luxurious look, removable | Areas without direct heat exposure |
Conclusion
Transforming your kitchen with a stylish backsplash doesn’t require emptying your wallet. After exploring these 27 budget-friendly options, you can see how affordable materials like peel-and-stick vinyl, painted tiles, and wallpaper can create stunning visual impact without the premium costs. Most impressive is how many of these kitchen upgrades cost under $20 while delivering professional-looking results that appear much more expensive than they actually are.
Your personal style preferences will guide which option works best for your space. Subway tiles offer timeless appeal, whereas metallic finishes provide contemporary flair. Alternatively, textured options like faux brick or reclaimed wood bring warmth and character to modern kitchens.
DIY-friendly installation remains a significant advantage of these inexpensive backsplash ideas. Though some options require basic tools and careful preparation, many can be completed in a single weekend without professional help. Materials like washi tape and contact paper allow renters to make temporary yet beautiful modifications without sacrificing their security deposits.
Practical considerations matter just as much as esthetics when selecting your backsplash. Areas near stoves or sinks benefit from water-resistant options like glass tiles or sealed surfaces. Additionally, easy-to-clean materials save countless hours of maintenance while maintaining their visual appeal.
The next time you feel your kitchen needs refreshing, remember that dramatic transformation awaits without breaking the bank. These wallet-friendly backsplash ideas prove that creativity and resourcefulness often deliver more impressive results than simply spending more money. Which of these affordable backsplash ideas will you try first?
FAQs
Q1. What are some affordable backsplash options for kitchens? Some budget-friendly backsplash ideas include peel-and-stick tiles, painted existing tiles, mosaic tile sheets, wallpaper, and beadboard paneling. These options can create stylish looks without the high cost of traditional tile or stone installations.
Q2. How can I create a high-end backsplash look on a budget? To achieve an expensive look affordably, consider using large-format tiles to mimic stone slabs, metallic peel-and-stick tiles for a modern touch, or glass tile accents for a luxurious feel. Proper installation and strategic placement can make these budget options appear more upscale.
Q3. Are there any DIY-friendly backsplash options? Yes, several backsplash ideas are suitable for DIY installation. Peel-and-stick tiles, painted tile backsplashes, and vinyl decals are particularly easy for homeowners to install themselves. Washi tape and chalkboard paint also offer simple DIY solutions for creative backsplashes.
Q4. What should I consider when choosing a backsplash material? When selecting a backsplash, consider factors such as durability, ease of cleaning, moisture resistance, and heat tolerance, especially for areas near stoves or sinks. Also think about how the material complements your existing kitchen design and whether it fits your budget and DIY skill level.
Q5. How can I make a small kitchen backsplash area more impactful? To maximize impact in a small backsplash area, consider using bold patterns or colors, incorporating reflective materials like glass or metallic tiles, or creating a focal point with a unique design or material behind the stove. Vertical tile layouts can also help create the illusion of more space.
Interested in similar content or opportunities. Contact Us